
PART 1. A two-part journey through the basics of smartphone photography
Long read 20 mins
The following post is an expanded view on the use of a smart phone for scale model photography, and is based on an excerpt from the forthcoming title: The Scale Modelling Photography Manual.
Achtung Spitfeur!
So, you make models, you have a sizeable social media following, and the folks at world can’t wait to see what you’ve been up to at that awesomely well-stocked, yet modest workbench of yours.
But those in-progress bench shots . . . They are, well, a bit on the hitty/missy side eh?
This post isn’t about finding new and interesting ways to massage a rampant ego, generate yet more followers, or harvest likes from bots on the sunlit side of the world at 3am, heck it’s not even about satisfying that subliminal-primordial drive to stand out/back from the herd with that next-level esoteric obscurity you knocked out in a weekend.
No, it is simply about taking good images that reflect the model – any model – in its best light.
Images that reflect our personal investment in, and love of the subject too.
Love, you say? That’s getting a bit soppy isn’t it? Why no not really.
Let’s face it, we don’t build unfeasably large Spitfires (“Another Mk IX sir? Oh go on then”) because we think it is expected of us, or are part of some compulsory element in the Plastic Model Aeroplanes 101 rites of passage. No, we build another big ‘ol Spitfuer because as Happiness Stan says, they bring us ‘deep joy’.

So it’s maybe stating the obvious to say that our latest loved-up projects’ journey from the depths of the fine art-adorned quality cardboard to the display case needs to be documented in a ‘warts and all’ exposé sort of way.
It deserves a decent snap.
Not a pixellated, blurry, hand-held, partially lit type of image. So if you’re one of those ‘I like making all-star shakey-bakey kits but taking a photo isn’t my bag’ types, then maybe now’s a good time to naff off to the pub or go and polish your Harder & Steenbeck (yes, that is a euphemism).
Of course, for the rest of us, we may have just had a little epiphany and gone: “Strewth cobber! shine a light! Why have I not made the effort with my duff pics before? My snaps are shockers, I must atone for my pixellated inadequacies. . .”
Consistently good images are where it’s at – not stellar knock ’em-dead shots, just consistently good, honest, considered, careful documentary images made with a minimum of fuss. And made with a smartphone too!
Don’t stop me now ( I’m having such a. . .)
We can and do spend a lot of time and effort obsessing over the choice of subject, the accuracy, detail and luxurious decal options, before splashing the cash, but still seem to think little of taking iffy photos of our ‘investment’.
Why?
I’ll hazard a guess – it’s either the ‘workbench chic’ mindset of authentic modelmaking, or a breathless ‘ don’t stop me, gasp, no time to take a great image, gasp, must crack on’ schtick at play, which usually goes something like:
- “My modelling mojo will evaporate, it took me three years to recover it last time”
- or the deep thinker who says:” I can’t possibly interrupt the existential flow of sprue to glue to oooh”
- or maybe it is the “gotta get those decals on before midnight or it will turn into a gremlin” stress head
- the passive-aggressive “it looks better in real life” (no it really doesn’t, learn to take a decent image!)
- or the perennial (and my firm favourite): “My models are amateurish and the photographs are mostly always poo, so why bother, and anyway it’s just the Book of Face chaps, they don’t mind/are used to my feeble camera excuses, and no one will see it anyway after ten minutes” and so on and so forth. . .
None of these excuses is valid, even close – the image is just as important as those impossibly straight canopy frames and getting that ‘spot on’ alternative version of cockpit green we spend hours researching applied.
The camera is dead, long live the. . .
I stated in the previous post that it is widely considered that the smartphone has democratised photography. This means instantaneous access, which means speed, which risks hastily grabbed shots with little thought applied to technique or camera skill just to bash out a snap for the ravenous hordes in social mediaville (or is that vile?)
This speed thing means it’s all too easy to take a so-so iffy shot of our model in a compromising state of undress – complete with all the bits and pieces and other shrapnel found on a typical workbench.
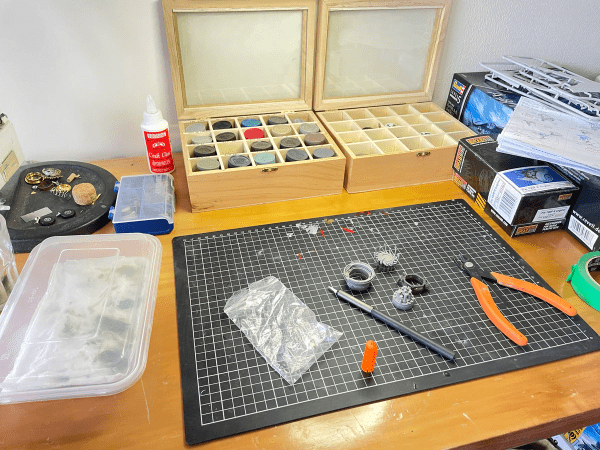
Yes, catching that raw styrene or resin goodness in its natural environment is very authentic, and a great way of inviting the world into our hobby room and onto the bench to ‘model along with. . .’ but it’s not really considered, controlled photography – it’s more ‘candid messiness with variable flat lighting’ and not much image composition either.
Self-effacing and an ‘honest’ example of random styrene activity it may be, but it’s not a good look, to be honest. Plus we know we all make models, it says so on the tin.
Shooting from the lip
This post is a two-parter walkthrough of how to make some simple improvements to the process of ‘shooting on the hoof’.
It’s not a half-day studio/big expensive lights approach, and I promise you don’t have to don a safari suit and break out the light meter – it won’t take too long, or spoil the flow of your modelling mojo either.
This first part is largely essential theory – and will look at smartphones in detail so that we can understand the limitations and strengths – a ‘know your gear’ approach.
Smartphone cameras’ limitations – aperture
The smartphone camera has some profound limitations for us scale model photographers because it lacks a variable aperture – arguably the single most useful creative control aspect of photography, and essential if we want to get as much of the model in sharp focus from front to back.
A variable aperture in a conventional lens/camera combo controls the depth of field (or DoF).
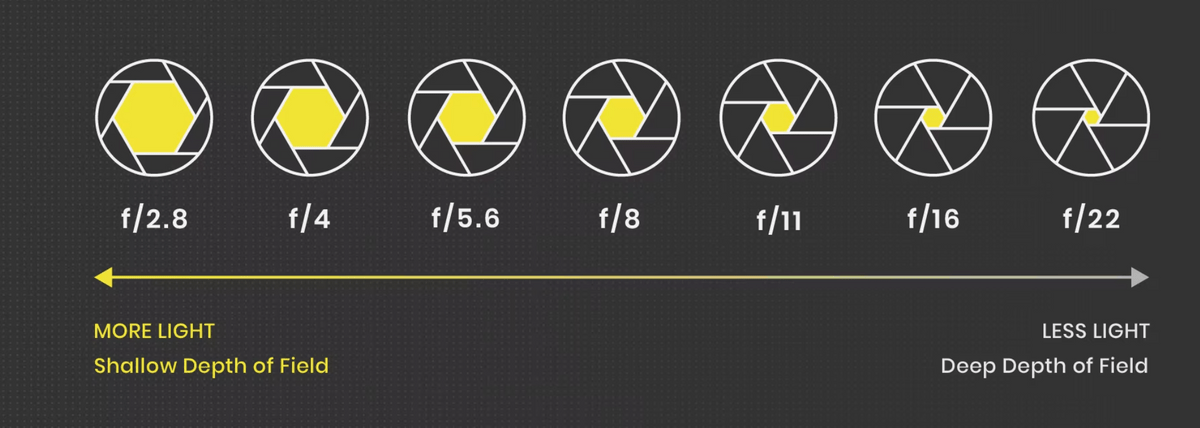
As builders and tyro photographic documentary image takers of small-scale things, we really need small apertures for maximum DoF so that our creations are in sharp focus from front to back or as much as possible.
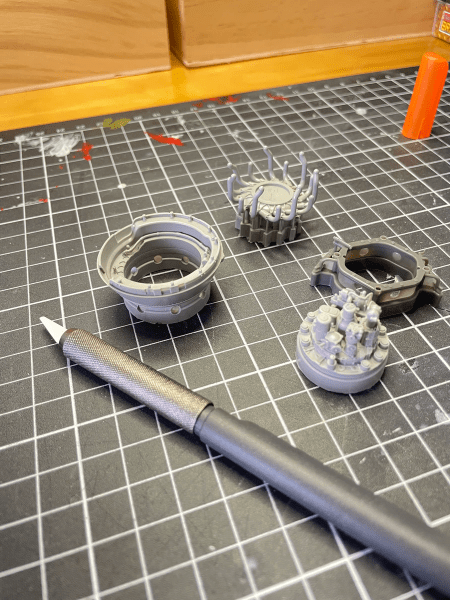
Unlike this shonky example – Strewth! it’s all blurry mate. . .
Large apertures: Bigger isn’t always better
So as we can see from the shot above, smartphones are not really all that good for scale model photography because the large fixed aperture only gives a shallow area of focus or depth of field (DoF).
But hang on chaps, all is not lost. We can sort of get around this fixed aperture/limited DoF problem to get as much of the model in sharp focus as possible. By:
1. Moving the camera away from the subject to optimise the DoF, and then editing the image by cropping out all the peripheral stuff we don’t want.
Or
2. Move the model into the cameras’ limited DoF zone as much as possible.
Or
3. Live with the shallow DoF and use it creatively to focus on key bits of the models’ groovier details.
Focal length: The other end of the telescope
Solution 1. Moving the camera away from the subject to maximise DoF needs a basic understanding of an aspect of camera design called focal length – and this is based on the physics of lens design and the distance from the lens’ optical centre to the recording plane (the sensor or film).
Basically, focal length determines how close we can get to anything with a camera and still be able to focus on that thing. Focal length works together with the aperture to control how much of the scene is focused – essentially the ‘depth’ part of depth of field.
The closer we go with a limited focal length and a large fixed-aperture smartphone, the smaller the DoF area will be.
Macro, micro and close-up: This limited DoF from a small focal length is also something to be aware of when using close-up filters or a macro lens on a DSLR.
Macro photography is all about recording stuff at lifesize or larger magnifications and really doesn’t lend itself to scale modelling unless we are trying to get seriously close to the detail. The quality of the model will be laid bare for all to point at and go “Look the decals are all wrinkly”.
Also, proper macro lenses are proper expensive. That flower ‘macro’ symbol on the camera control really isn’t true macro. There is a section on macro and close-up techniques in the book.
Back to smartphones: In a phone camera, this focal length distance is really very small. To try to get around this, smartphone designers will include at least two (some have three or more) lens/sensor pairings to cover different focal length/aperture combinations. These are based on ‘average’ image types/situations and the demographic of typical users.
Most phones will usually have a wide angle, a telephoto lens option, and sometimes an ultra-wide angle lens. All options have fixed apertures and all limit the amount of pixel sensor surface being covered by the lens.

The optimal setting for us modellers is usually the wide angle grouping as it optimises the angle of view and the area of the sensor covered. However, we usually don’t get to manually choose the lens setting because the smartphone algorithm switches between the lens/aperture options as it continuously assesses the scene based on thousands of pre-loaded parameters and the movement of the device.
As model makers, we can obsess about detail and our normal instinct is to get as close as possible to capture that sifty styrene goodness and cool stuff we are inherently proud of/cost us a fortune.
But the smartphone has poor DoF and getting too close squeezes that DoF area more. There’s more to it than this and we start to get technical about light and inverse square laws. . another day maybe.
Anyway…
The apparent logical solution is to physically move the camera away from the model and then zoom in a bit using the telephoto function to get closer to the model. But all this does with a smartphone is switch the phone to a setting that limits the area of the tiny sensor covered by the ‘tele’ lens settings.
In turn, this reduces our resolution (visible detail) even further.
So the best choice is to maximise a limited DoF and maintain resolution (details) by moving the model away from the lens and using the wide angle lens setting, which in most phones covers an optimal area of the sensor. We do this in conjunction with moving the model around in the limited DoF area of sharpness so that as much of the model falls within that zone as possible.
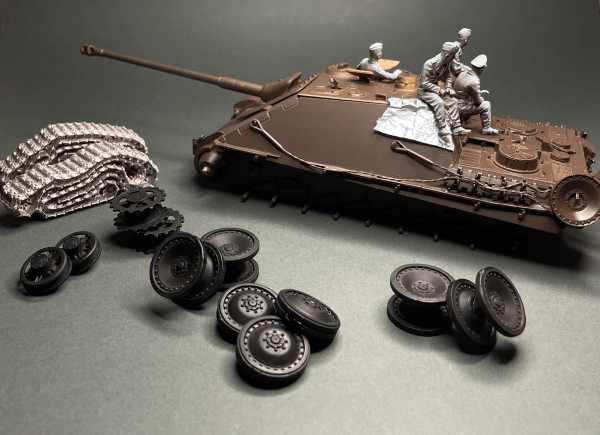
In practical terms, this means rotating something like a fuselage or a tank gun barrel around so that the long axis is not pointing at the camera lens.
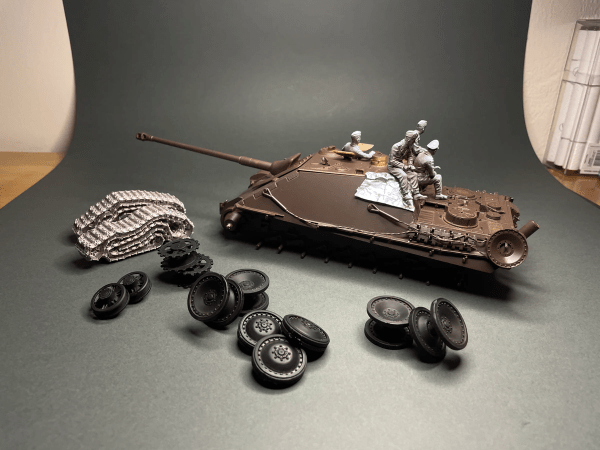
The next easy step is to crop the image to remove the edges and other rubbish in the shot. We can see that there is still an issue with DoF as the road wheels in the foreground are out of focus and the rearmost crew dude’s head is blurry too. We will look at doing all of this in more detail in Part 2 of this post.
But it looks good on my phone screen. . . no really, it’s smashing (just small)
But even after doing this simple trick, image resolution and sharpness (essential to us) is still an issue – not such a huge deal if we only ever view the image on a mobile device but look at it on a big computer screen with bigger pixels and it will rapidly lose detail.
That image on the phone might look good, in fact it will look sharp and detailed (if we’ve followed some basic photography techniques like using a tripod or support and a self-timer), but this tightly packed screen full of tiny pixels (remember pixels can vary in size and colour quality) doesn’t really allow us to crop and then digitally ‘enlarge’ an image in the conventional sense that a 35 mm DSLR with a large sensor and millions of pixels does.
We might just get away with this if its only ever viewed on another phone, but if we post it to Facebook and someone sees it on their desktop PC then its not going to look all that hot.
This is another reason why we say that we need to know when to use a phone, and when to reach for the DSLR.
But all is not lost – Alternatively, we can use that shallow DoF to our advantage and get creative to make sure the bit of the model or some super detail we want to be in sharp focus is in that area of sharpness covered by the DoF.
It also forces the viewer to accept that there are bits just out of focus and by human nature, they will be intrigued by this and want to see more. All good for a series of posts on social media to tease our audience with.
Ultimately, this is getting photographically creative and beyond this post for now, but we will return to this in part 2 of this post with a walk through of setting up a workbench to take an in-progress photo and then edit it and post it to social media.
Until next time – go well.
Image credits:
https://www.glass-imaging.com/smartphone_camera_design_basics.html
https://pavilion.dinfos.edu/Article/Article/2164588/camera-aperture-demonstration
