
Optimising the workbench as an ad-hoc photo studio for smartphone images
The following post is an expanded view on the use of a smart phone for scale model photography, and is based on a chapter from the forthcoming title: The Scale Modelling Photography Manual.
The inside scoop
In part 1 we investigated the hows and whys of smartphones and the technical limitations which face us model makers when trying to take half decent non blurry images of our latest creation on the miniature battlefield that is the average workbench.
The main aim here is to take in-progress shots to document the process with controlled, thoughtful and really useful images.
Less is more – We all know we make models, so there is no need to include the ‘kitchen sink’ in these shots every time.
Here’s one I made earlier
Let’s recap part 1 – the fundamental limitation of smartphone photography is the combination of small focal lengths, large apertures and tiny sensors.
If we need a reminder – the focal length of any type of lens is the controlling factor of how much of a scene is covered by a lens and how close we can get to a model and it still be in focus. Short focal lengths like the ones found in smartphones also mean potential distortion of the model’s proportions.
A large aperture is great for gathering light with a small lens and tiny sensor, but means a narrow area of sharp focus (Depth of Field – DoF).
The combination of small focal length with a big aperture means that the closer we get to a model, the shallower the sharp area of focus will be.
Top tip: It’s not the cameras’ inability to ‘focus’, it’s simply the physics of lens design and its mechanical limits. So if our camera struggles to focus on a model, it’s not poor technique, a duff camera, or that we need a macro lens (we really really don’t need one of these unforgiving, expensive and difficult to use things) it’s simply that we are probably just too close to the model.
Glad that’s sorted, now let’s look at how we can improve those workbench images by making a few changes to the environment and temporarily convert our build space to a photo space to get ourselves some consistent image making going on. (We’ll think about creativity and getting clever with composition to tell visual stories in a later post).
As Happiness Stan would say: “Are you sitting comftibold two square on your botty? Then I’ll begin”.
1. Get the skinny – use a scoop
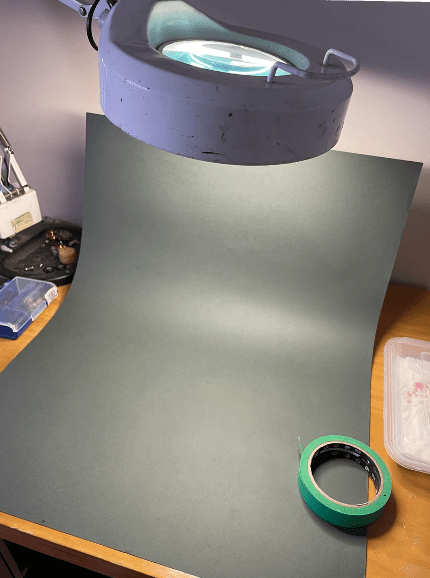
The bread and butter of any photo studio is what is known as a ‘scoop’ or cyclorama. Essentially a permanent commercial studio floor/wall space (a ‘cyclo’ or cyc wall) or portable table (scoop) with a gentle curved transition backdrop to control hard edge shadows where the horizontal plane changes to vertical backdrop.

There’s a lot we can do with a basic ad-hoc scoop and it doesn’t need to occupy a permanent fixture in our hobby room either. (But if you have the space, why not set up a permanent photo scoop area and leave your lights set up in the optimal position).
This post is all about minimising the interruption and flow of modelling while taking consistent quality images, and we can achieve this by slipping a scoop (also known as a ‘support’) over the cutting mat to turn our workbench into an ad-hoc photo studio space.
Really, it’s that easy.
A large sheet of heavyweight card will do the job. A2 or larger ideally, but whatever fits your own workspace.
We’ll get to choosing colour and contrast with our model in a future post but for now its easy to use a neutral contrasting tone dark model – go light/light model – go dark.
If we want to get creative, we can employ complimentary (opposite to the model’s main colour) or an analogue (adjacent to the model’s main colour) version as the support. Grab a cheap adjustable colour wheel from an arts and crafts store to help with this.

For starters any heavy card will do. The colours shown below are a range of Fabriano A2 180 gsm textured art papers which are readily available in arts and craft stores, and an ideal and economic way to play with background colour.

Of course we can do the background colour thing digitally in a post edit software – we do this by starting off with a mid grey support (Kodak 18 Grey) and then using mask tool in layers in Photoshop to select and replace the background grey value – Easy if we have the digital chops – but this post (and my book) is about the essential basics and practical skills, so it’s much more fun to do this manually with a physical coloured ‘scoop’ on our workbench.

So yeah – the scoop. Basically a bit bit of paper or card with a nice curve from horizontal to vertical – use a bit of low tac masking tape to secure the scoop to the wall or the desk to stop it sliding around.
2. Light it up!
Next up is our light source:
- do we have enough light?
- is it the ‘right’ light?
- but don’t we need proper photography studio lights?
- and a myriad of other questions (that are answered in the blog posts about light fundamentals).
So yeah, enough light – it is always better to have more light than we think we will need – largely due to that Inverse Square Law thing which means light doesn’t travel as far as we think it will.
There are two pieces of physics that every photographer MUST learn if they want to be able to consistently create good photos. One is controlling Depth of Field (DoF) to understand just how much of our model will be in sharp focus, and the other is the inverse-square law to understand how much light we need and how far it will travel.
We cover these in depth in other posts and in my book, but for now we are trying to make some consistently good images with the available light on our workbenches, so we will focus on a practical approach.
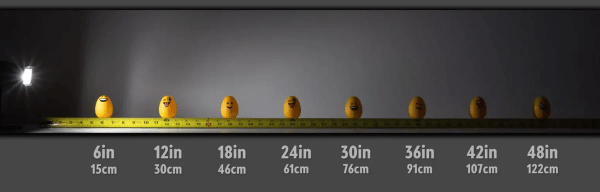
Here’s a fun visual to show just how light intensity or brightness drops much faster closer to the source than it does further away from the source. That also means that the closer our subject is to our light source, the harsher the highlights/shadows and the quicker the light will dissipate too.
The further our subject is from the light source the dimmer the light will be plus the shadows will be softer and the light will spread over a larger area.
The main drawback of a conventional workbench light is that it will usually be fixed and either non directional or have limited movement. This is by design to provide a uniform even spread of light.
Not really ideal for a creative photographic purposes as we cannot ‘model’ (use light to control shape, texture and detail) light in a photo studio sense.
We also risk having our light too close to our subject – this makes sense as we need to see stuff when we are modelling but will lead to harsh highlights and detailess shadows in an image. Remember – our eyes evaluate and compensate continually but a camera lens and sensor are fixed limited range reactive devices.
But what about the right light? – This one’s a bit more complex in that while it is true that we can spend a fortune on professional balanced studio lights, really any consistent light source can be used for starters.
One important fact though is that we must align our camera WB settings with the light output (kelvin light temperature).
So that old hobby light is probably going to work ok for now if we measure its kelvin setting and set our camera to match this.
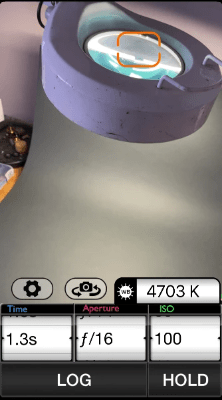
To do this we need a free light meter app for our phone camera to accurately measure the light’s values in kelvin (K). This is a screen grab from my iPhone 12 mini showing the Light Meter reading for the ring light. It’s saying the light is 4703 K which is about right for a flourescent unit of this type.
But what about fancy studio lights? (Note – plural ‘lights’) – the standard studio set up is at least two positionable light units with three being the optimal – One ‘key’ light and two lower output fill lights which are moved around the model to create a pool of light and create the shape and texture of the object.
For workbench photography, having three lights – even small ones, is just impractical due to space and the time to set up, so no, we don’t need fancy studio lights, soft boxes or ‘egg crate’ diffusers either.
3. Make sure you get my best side
At this stage we’ve been pretty much focused on what the basic tools we need to achieve this and then understand how we will go about it. Now its time to crack on, and the next few stages are really quick.
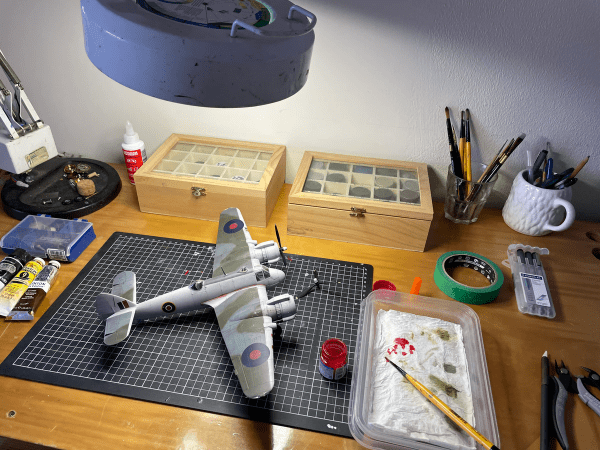
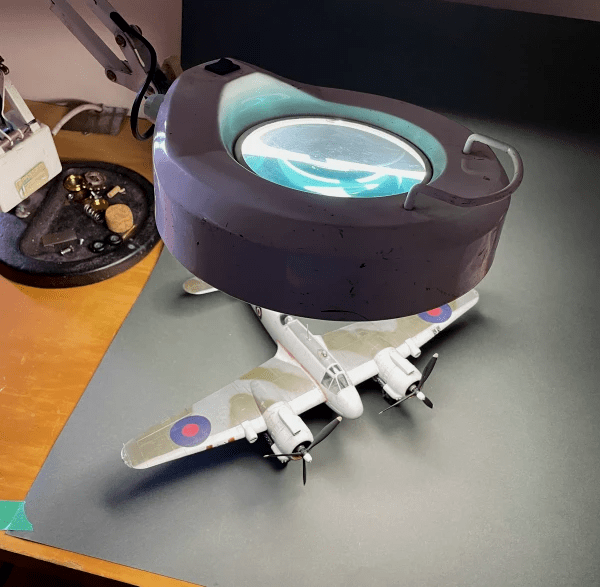
So we’ve moved stuff like paint pots and assorted modelling shrapnel off to the side and as far out of shot as is possible without upsetting the natural order of things, and that background scoop has a lovely gentle curve up to create a nice gradient tone from light horizontal foreground to dark vertical background – making the most of the inverse square law.
This curve is important as we want to avoid a harsh shadow delineation where the horizontal meets the vertical, and at the same time, separate the model from its background (the support) while keeping some shadow detail to ‘ground’ it.
We don’t need to ‘get creative’ with the images at this point – we just need to set up a shot that we can then replicate again to document the build process at key moments in the life of the model.
To make sure we do this consistently, we can take a wide reference phone shot of the set up once we are happy with the position of everything- or make a note of how we arranged this with a quick sketch.
Oh flip, my modellin’ mojo has left the building
But we might be painting something and touching the model is a no-no right now. We might ask, “can I not just photograph it on the bench without all this palarver?”
No.
Go and have a cuppa and a hob nob or a nice sit down, and come back when the sub-assembly is dry enough to touch.
4. Now the light fades out, and I wonder what I’m doing in a room like this . . .
Stop! Don’t use the standard built in phone camera button thingy.
a). Download a good free camera App for the phone.
I like Reeflex for the iPhone but there are lots of very capable and free apps for Apple and Android devices such as Camera+ which allow us to take some control over the built in camera algorithmic mumbo-jumbo.
Remember we cannot change the aperture setting but we can change shutter speed, WB (match light temp to camera setting) ISO (camera sensors sensitivity to light) and EV (exposure value).
One key function of Reeflex is that it allows the white balance (WB is measured in kelvin K) to be fine tuned with a slider control.
b). Download a lightmeter app.
Why do we need this? Well we might know what the output of our worklight from the stated rating but this might change due to voltage irregularities, or the light unit may have a different bulb fitted. So an app like Pocket Light Meter lets us measure the WB kelvin reading of the light source and also the reflected light from the models’ surface too.
We can then fine tune our camera App WB setting to match this light output and reflected light. Bingo! The colour looks much better eh? (not spot on, but a big improvement).
Its not exactly the same way that we would control WB in a studio with incident metering and other light measure/controlling techniques, but it is a whole lot closer and better than the phones’ built in ‘near enough’ algorithms.
5. Lights – camera – action (really? Sheesh)
This post is all about minimal modelling disruption while setting ourselves up to take consistently good workbench documentary images time and again.
It is at this point that we can think about controlling and manipulating the hobby light. There may be some physical adjustment available in our model light and this should be used to full advantage to experiment with light angle, direction, distance from the model and how its changes the way the model looks.
It’s all about stepping back a bit and taking the time to look at this with fresh eyes.
Look at the highlights and the shadows and the bits in between. Is the colour ok?
Does it look a bit flat and one dimensional?
It is obvious from this basic set up test image that the shadows are too strong and the white balance light temperature of 4700 K is too warm making the white look yellowish.
The first thing to be aware of here is to match the phone cameras’ white balance (WB) setting to the lightsource output and compare this with the reflected light temperature reading from the model.
That might be easier said than done and many smart phone camera settings either don’t allow this, or use limited presets (sunny, cloudy, indoors, animals, fireworks, aunt Flo’s 80th birthday party and so on).
Using an app like Reeflex means we can assume control of WB and fine tune as much as possible.
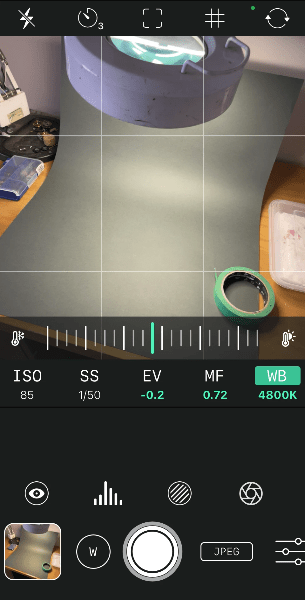
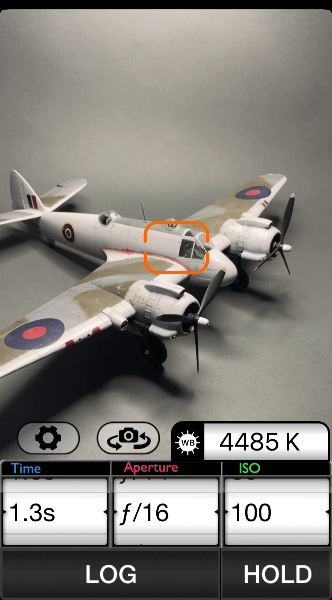
Next step is to use the Light Meter app again to check the WB value of the light being reflected from the model to the camera lens. We can see in this screen grab that the red target in the Light Meter App is reading 4485 K from the white sides of the Beaufighter – lower than the original 4700 K.
So the trick here is to pick a kelvin value somewhere between 4700 and 4200 K as a starting point to make sure our white looks white and not yellow (warm) or blue-ish (higher K values will be ‘cooler’).
6. Ok, now it’s camera, action time!
The next key thing to do is to bring the light physically forwards if possible to create a drop off in shadow towards the rear of the scoop. Yes this is a step towards creative photography, but we want to isolate the model so this is desirable.
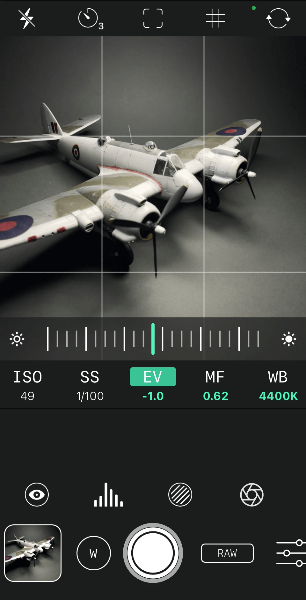
In the screen grab below, I have used the EV slider in the Reeflex app to manipulate the exposure value and create more atmospheric background shadow. This balances the dark shadows under the wings with the background and gives more tonal cohesiveness.
This is purely personal and getting a bit creative for this post, but it works because the Beaufighter is predominantly white and there is a wide range of EV values between the white and black shadows. Turning down the EV to -1.0 brings this wide range under better control.
EV and how digital cameras have a limited range of EV is a subject all of its own and will be covered in a future post on how to make blacks black and whites white.
Once we have the WB and EV sorted we can try to improve the contrast detail and ‘model’ our model by moving the single light source or the model around to optimise the detail and create some shape using the single light.
This is a single-point light source exercise, so there will be areas which are in deep shadow and we either live with this, or use bounce reflectors to redirect available light into the shadows.
Working with bounce cards will be covered in a future post.
The point is that we are now in a process of photographing the shape of the model and trying to get it to look like we see it, not worrying too much about how others might view it.
Note: I’ve selected a RAW file format in Reeflex to maximise the pixel data and image resolution.
Reeflex doesn’t allow digital zoom in RAW mode, so we are forced to physically move the phone around to get closer and set up the shot as we would do with old school film and a fixed prime lens. In RAW Reeflex will still let the camera auto-focus, so there’s no need to worry about blurry shots if our hand-held camera technique is good.
Good technique folks! Steady breathing, good hold and if you can use a support or mini tripod.
Not too shabby?
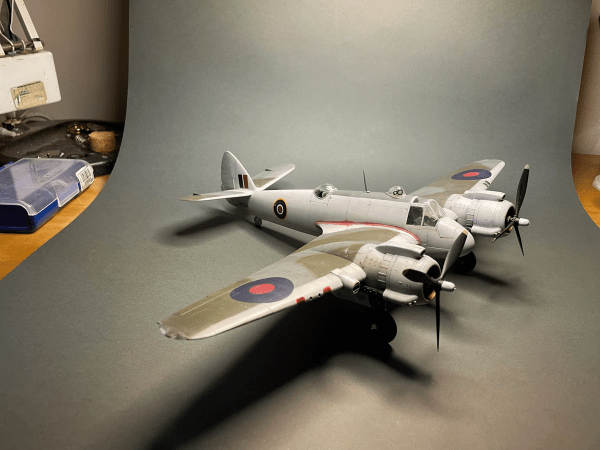
This is the final image from what took around 10 minutes to set up, adjust and shoot.
Of course I’ve been doing this for quite some time so your first attempts might take a bit longer, but once you have the WB sorted and the process of introducing a scoop and knowing how you want it all to look, it will be very quick to replicate time and again.
Ideal for in-progress workbench construction shots where separating the model from the clutter of the cutting mat elevates it to its righteous place as a craft based artistic endeavour.
The ‘finished’ shot below has some limitations such as the shallow area of focus (depth of field – the front Hercules is in focus and everything else is soft!) and overall sharpness issues due to the handheld phone. The uppermost highlight areas are also a bit ‘blown out’ – always a risk with white subjects – the carb intakes lack any detail.
To improve this, I could reduce the intensity of the light (move it away slightly), move the phone camera away from the model to maximise limited DoF, and use a tripod or holder with a remote release to sharpen the detail.

Fair use image credits:
https://www.joeedelman.com/inverse-square-law
popperfoto – Getty Images http://t2.gstatic.com/licensed-image?q=tbn:ANd9GcReOd_bfSwdDNn-PLMDVU-3njSJp1Ubnr_bEqJRAaQc160gz-fcd0W3XHEQZTYmAKh9
https://www.daler-rowney.com/colour-wheel
All other images – the author.
